Add Payments
The Devvit payments API is available in Devvit Web. Keep reading to learn how to configure your products and accept payments.
To start with a template, select the payments template when you create a new project or run:
devvit new
To add payments functionality to an existing app, run:
npm install @devvit/payments
Make sure you’re on Devvit 0.11.3 or higher. See the quickstart to get up and running.
Implement Devvit Web payments
Configure devvit.json
You can reference an external products.json file, or define products directly. Endpoints are required for fulfillment and optional for refunds.
{
  "payments": {
    "productsFile": "./products.json",
    // optionally define products here: "products": [...] instead
    "endpoints": {
      "fulfillOrder": "/internal/payments/fulfill",
      "refundOrder": "/internal/payments/refund"
    }
  }
}
Server: fulfill (and optional refund)
Create endpoints to fulfill and optionally revoke purchases.
- Hono
- Express
import type { PaymentHandlerResponse, Order } from "@devvit/web/server";

app.post("/internal/payments/fulfill", async (c) => {
  const order = await c.req.json<Order>();
  // Fulfill the order (grant entitlements, record delivery, etc.)
  return c.json<PaymentHandlerResponse>({ success: true });
});

app.post("/internal/payments/refund", async (c) => {
  const order = await c.req.json<Order>();
  // Optionally revoke entitlements for a refunded order
  return c.json<PaymentHandlerResponse>({ success: true });
});
import type { PaymentHandlerResponse, Order } from "@devvit/web/server";

router.post<string, never, PaymentHandlerResponse, Order>(
  "/internal/payments/fulfill",
  async (req, res) => {
    const order = req.body;
    // Fulfill the order (grant entitlements, record delivery, etc.)
    res.json({ success: true });
  },
);

router.post<string, never, PaymentHandlerResponse, Order>(
  "/internal/payments/refund",
  async (req, res) => {
    const order = req.body;
    // Optionally revoke entitlements for a refunded order
    res.json({ success: true });
  },
);

export default router;
Server: Fetch products
On the server, use payments.getProducts() and payments.getOrders(). If the client needs product metadata, expose it via your own /api/ endpoint.
- Hono
- Express
// Example: expose products for client display
import type { Product } from "@devvit/web/shared";
import { payments } from "@devvit/web/server";

app.get("/api/products", async (c) => {
  const products = await payments.getProducts();
  return c.json<Product[]>(products);
});
// Example: expose products for client display
import type { Product } from "@devvit/web/shared";
import { payments } from "@devvit/web/server";

app.get<string, never, Product[], never>("/api/products", async (_req, res) => {
  const products = await payments.getProducts();
  res.json(products);
});
Client: trigger checkout
Use purchase() from @devvit/web/client with a product SKU (or array of SKUs).
import { purchase, OrderResultStatus } from "@devvit/web/client";

export async function buy(sku: string) {
  const result = await purchase(sku);
  if (result.status === OrderResultStatus.STATUS_SUCCESS) {
    // show success
  } else {
    // show error or retry (result.errorMessage may be set)
  }
}
Register products
Register products in the src/products.json file in your local app. To add products to your app, run the following command:
devvit products add
Registered products are updated every time an app is uploaded, including when you use Devvit playtest.
Click here for instructions on how to add products manually to your products.json file.
The JSON schema for the file format is available at products.json schema.
Each product in the products field has the following attributes:
| Attribute | Description |
|---|---|
sku | A product identifier that can be used to group orders or organize your products. Each sku must be unique for each product in your app. |
displayName | The official name of the product that is displayed in purchase confirmation screens. The name must be fewer than 50 characters, including spaces. |
description | A text string that describes the product and is displayed in purchase confirmation screens. The description must be fewer than 150 characters, including spaces. |
price | An predefined integer that sets the product price in Reddit Gold. See details below. |
image.icon | (optional) The path to the icon that represents your product in your assets folder. |
metadata | (optional) An optional object that contains additional attributes you want to use to group and filter products. Keys and values must be alphanumeric (a - Z, 0 - 9, and - ) and contain 30 characters or less. You can add up to 10 metadata keys. Metadata keys cannot start with "devvit-". |
accountingType | Categories for how buyers consume your products. Possible values are:
|
Price products
Product prices are predefined and must be one of the following gold values. Click here to see your options.
- 5 gold ($0.10)
- 25 gold ($0.50)
- 50 gold ($1)
- 100 gold ($2)
- 150 gold ($3)
- 200 gold ($4)
- 250 gold ($5)
- 300 gold ($6)
- 350 gold ($7)
- 400 gold ($8)
- 450 gold ($9)
- 500 gold ($10)
- 550 gold ($11)
- 600 gold ($12)
- 650 gold ($13)
- 700 gold ($14)
- 750 gold ($15)
- 800 gold ($16)
- 850 gold ($17)
- 900 gold ($18)
- 950 gold ($19)
- 1000 gold ($20)
- 1050 gold ($21)
- 1100 gold ($22)
- 1150 gold ($23)
- 1200 gold ($24)
- 1250 gold ($25)
- 1500 gold ($30)
- 1750 gold ($35)
- 2000 gold ($40)
- 2250 gold ($45)
- 2500 gold ($50)
Actual payments will not be processed until your products are approved. While your app is under development, you can use sandbox payments to simulate purchases.
Design guidelines
You’ll need to clearly identify paid products or services. Here are some best practices to follow:
- Use a short name, description, and image for each product.
- Don’t overwhelm users with too many items.
- Try to keep purchases in a consistent location or use a consistent visual pattern.
- Only use the gold icon to indicate purchases for Reddit Gold.
Product image
Product images need to meet the following requirements:
- Minimum size: 256x256
- Supported file type: .png
If you don’t provide an image, the default Reddit product image is used.

Example
{
  "$schema": "https://developers.reddit.com/schema/products.json",
  "products": [
    {
      "sku": "god_mode",
      "displayName": "God mode",
      "description": "God mode gives you superpowers (in theory)",
      "price": 25,
      "images": {
        "icon": "products/extra_life_icon.png"
      },
      "metadata": {
        "category": "powerup"
      },
      "accountingType": "CONSUMABLE"
    }
  ]
}
Purchase buttons (required)
Use your own UI (e.g. a button or product card) and call purchase(sku) from @devvit/web/client when the user chooses a product. Follow the design guidelines (e.g. gold icon, clear labeling).
Webviews
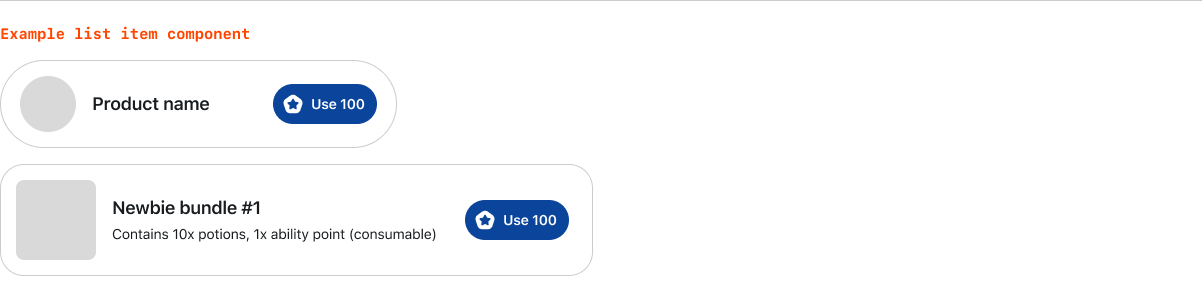
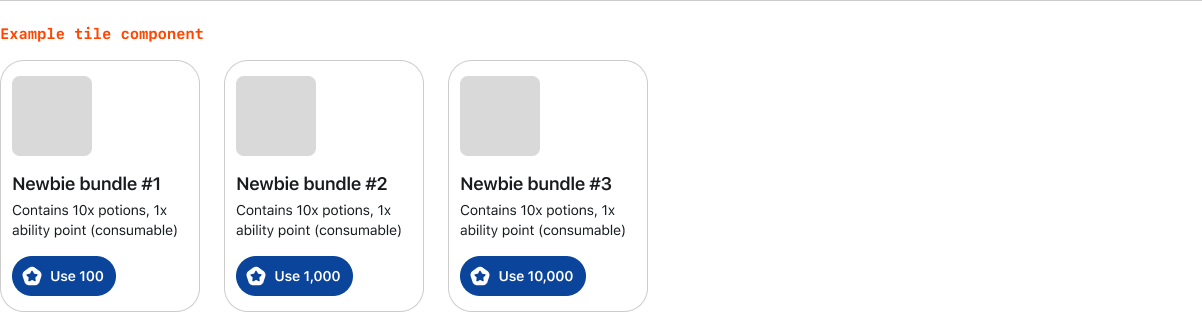
Use Reddit’s primary, secondary, or bordered button component and gold icon in one of the following formats:

Use a consistent and clear product component to display paid goods or services to your users. Product components can be customized to fit your app, like the examples below.

Complete the payment flow
Your fulfill endpoint (configured in devvit.json and implemented in the server) is called during the order flow. It customizes how your app fulfills product orders and lets you reject an order.
Return { success: true } to accept the order, or { success: false, reason: "<string>" } to reject it and send a message to the client. Throwing an error in the handler also rejects the order.
This example shows how to grant an "extra life" in your fulfill endpoint when the user purchases the "god_mode" product (using Redis from @devvit/web/server):
import type { PaymentHandlerResponse, Order } from "@devvit/web/server";
import { redis } from "@devvit/web/server";

const GOD_MODE_SKU = "god_mode";

app.post("/internal/payments/fulfill", async (c) => {
  const order = await c.req.json<Order>();
  if (!order.products.some((p) => p.sku === GOD_MODE_SKU)) {
    return c.json<PaymentHandlerResponse>({
      success: false,
      reason: "Unable to fulfill order: sku not found",
    });
  }
  if (order.status !== "PAID") {
    return c.json<PaymentHandlerResponse>({
      success: false,
      reason: "Becoming a god has a cost (in Reddit Gold)",
    });
  }

  const redisKey = `post:${order.postId}:user:${order.userId}:god_mode`;
  await redis.set(redisKey, "true");
  return c.json<PaymentHandlerResponse>({ success: true });
});
Implement payments
The frontend and backend of your app coordinate order processing.
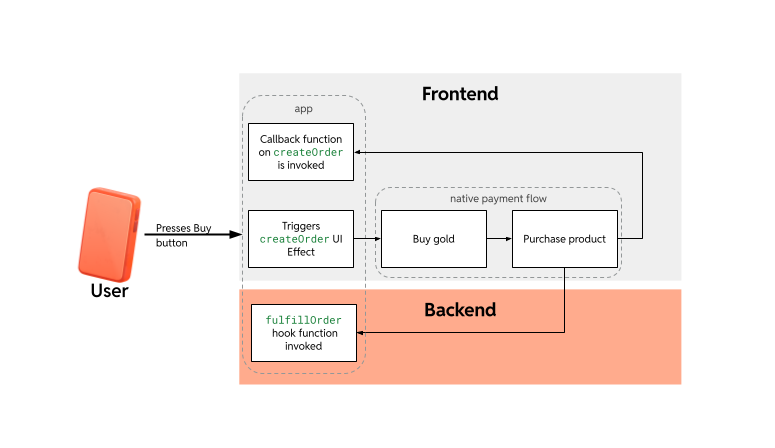
To launch the payment flow, call purchase(sku) from @devvit/web/client. That triggers the native payment flow on all platforms (web, iOS, Android); Reddit then calls your server's fulfill endpoint. Your app can acknowledge or reject the order (for example, reject once a limited product is sold out).
Get your product details
Server: Use payments.getProducts() in your server (see Server: Fetch products) and expose products via your own /api/products (or similar) endpoint if the client needs them.
Client: Fetch product metadata from your API and use it to display products and call purchase(sku):
import { purchase, OrderResultStatus } from "@devvit/web/client";

// Fetch products from your server endpoint
const products = await fetch("/api/products").then((r) => r.json());

// Render your UI; when user chooses a product:
async function handleBuy(sku: string) {
  const result = await purchase(sku);
  if (result.status === OrderResultStatus.STATUS_SUCCESS) {
    // show success
  } else {
    // show error or retry (result.errorMessage may be set)
  }
}
Initiate orders
Provide the product SKU to trigger a purchase. Use purchase(sku) from @devvit/web/client; the result indicates success or failure.
import { purchase, OrderResultStatus } from "@devvit/web/client";

export async function buy(sku: string) {
  const result = await purchase(sku);
  if (result.status === OrderResultStatus.STATUS_SUCCESS) {
    // show success
  } else {
    // show error or retry (result.errorMessage may be set)
  }
}